¶ Storage
¶ Partitions, File Systems and Mounting
There are two types of partitions,
MBRandGPTpartitions.MBRpartitions are an older style of partitions, there is a maximum of 4 partitions that can be set. Meanwhile,GPTpartitions are a bit newer and can have a maximum of 128 partitions.
- By default, fdisk will create MBR partitions, however you can utilize this utility to create GPT style partitions. gdisk will create GPT by default.
fdisk [options]
- You can view disks on a system by using lsblk -f. You can use fdisk to view the current partitions as well.
lsblk -f
sudo fdisk -l
sudo fdisk -g # Create GPT partitions
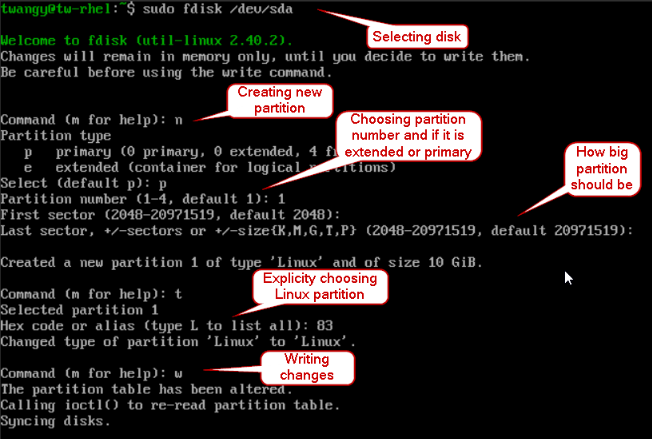
- You can select a disk with fdisk like so to partition it.
sudo fdisk /dev/[device]
formatting with fdisk
deleting a partition with fdisk
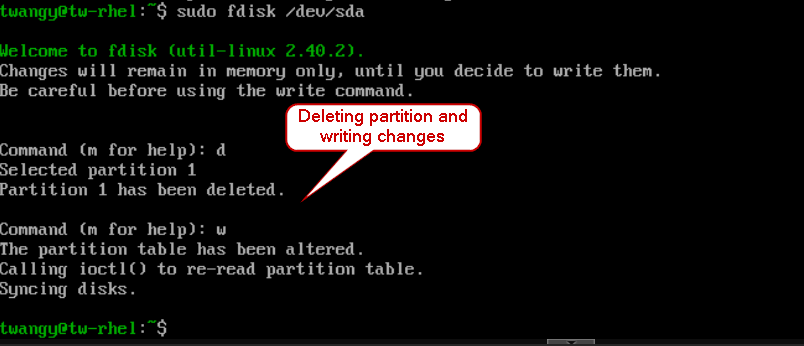
One thing to note is that it will not write any changes until you enter w to save.
¶ gdisk depreciated RHEL v10
Similar to fdisk, you can use gdisk to create partitions however it will make GPT partition styles by default. gdisk has been removed in RHEL 10 though, I just noticed. You can also use parted... I do like fdisk a lot.
sudo gdisk [target dev]
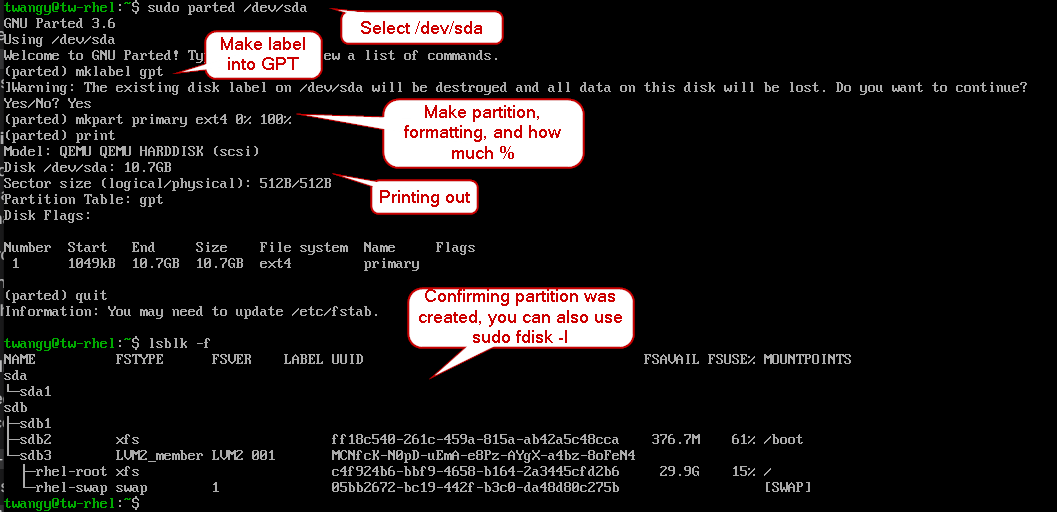
- You can also use parted utility to create partitions
sudo parted -l # Get listed of partitions
sudo parted [target dev]
# You can delete and create partitions here
Using parted
¶ File Systems
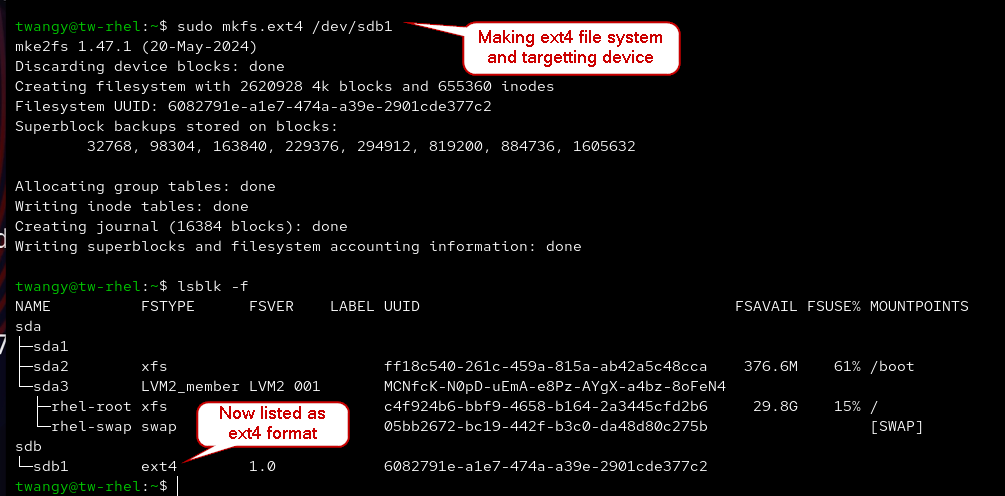
Whenever you create a partition, it isn’t automatically formatted with fdisk, that is where mkfs comes into place. There are multiple different formats like xfs, ext4, and more. With RHEL, by default the file system will be xfs, however Debian based Distros (like ubuntu) will be ext4.
sudo mkfs.[format] [target dev] # Create file system
- By default, mkfs will create a
ext2format. You can specify what file system you like.
sudo mkfs.ext4 /dev/sdb1 # Create ext4 file system on partition 1
sudo mkfs.xfs /dev/sdb1 # Create xfs file system on partition 1
creating filesystem with mkfs
¶ ext4 vs xfs
One of the bigger downsides of
xfsis that you cannot shrink the size, however you can of course increase the size. Unlikexfs,ext4can be increased or decreased in size with no problem.
- Together
ext4andxfswill journal, howeverxfswill copy on write. If you make a modification to a file, you keep a copy of the original file. You can also repair a xfs file system with xfs_repair, however the file system must be unmounted.
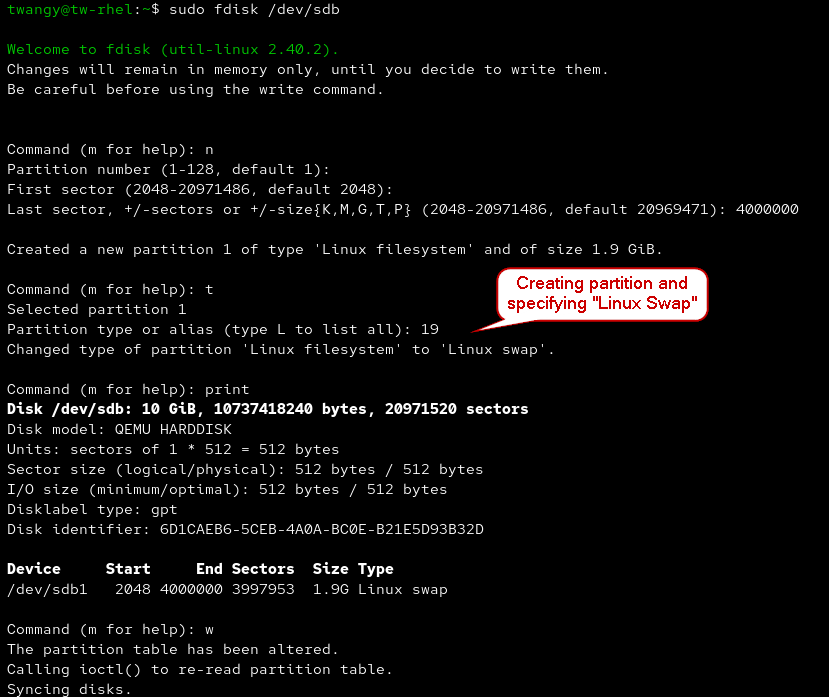
¶ Creating swap space
- When creating a partition, you can create a partition that is ready to be used for swap space with fdisk
initializing swap space with fdisk
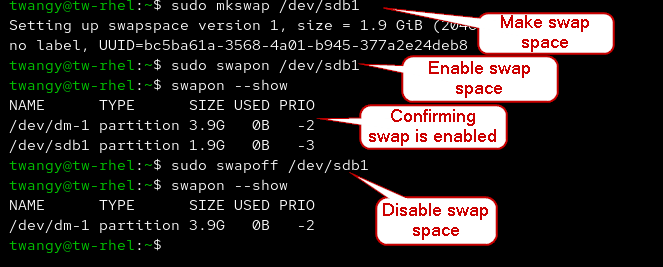
- Like making a file system, you can use mkswap to create a swap space. Afterwards, you can use swapon to enable.
sudo mkswap /dev/[dev] # Create swap space
sudo swapon /dev/[dev] # Enable
swapon --show # Confirm enabled
sudo swapoff /dev/[dev] # Disable
Creating Swap Space
¶ Additional Commands for LVM
There are a lot more commands available for LVM, you can enter lvm to enter an interactive menu. Once you are inside, you can view all the other commands by typing help.
lvm
help
- There are a lot of commands, however you can expand, reduce, rename, and more with the commands listed. Let’s say I wanted to expand my LV, we can use lvextend
sudo lvextend -L 3G /dev/mynewvolume/firstchunk # Make 3GBs the new space
sudo lvreduce -L 2G /dev/mynewvolume/firstchunk # Return back into 2GBs
¶ Stratis
Stratis uses pools, they will be the xfs file system built in. A little less flexible than LVMs, Stratis will automatically grow the file system as needed, kind of like auto-expanding archiving for Exchange mailboxes.
- With Stratis, you must manually install it using dnf
sudo dnf update # Apply updates
sudo dnf install stratisd # Install
sudo dnf install stratis-cli # Install CLI
sudo systemctl enable --now stratisd # Enable daemon
- You can create and append disks into Stratis like so
sudo stratis pool create [new pool name] [target device] # Creating pool
sudo stratis pool add-data [target pool] [target device] # Adding into pool
- You can view information for Stratis
sudo stratis pool list # List pools and their information
sudo stratis blockdev list # View physical disk information
- Creating the file system, and then viewing it
sudo stratis fs create [target pool] [new filesystem name] # Create file system
sudo stratis fs list # View file systems
- Taking the UUID from stratis fs list, you can edit your /etc/fstab file so you can mount it to the system
Append to /etc/fstab
UUID= 0750e412-06e3-4ff4-a913-e3ad0911315f /home/twangy/stratismount xfs x-systemd.requires=stratisd.service 0 0
- Removing stratis is done like so
sudo stratis filesystem destroy [pool] [filesystem] # Remove file system
sudo stratis pool destroy [pool] # Destroy the pool
¶ Mounting
You can use the lsblk -f command to see current mount points, however the mount command also works but it is a bit cluttered though…
¶ Non-persistent mounting
- You can create mount points with the mount command, however it is not persistent if you reboot. You can also unmount using umount
sudo mount -t [format] /dev/[device] [target directory]
# You can also use UUID instead of device
sudo mount -U [UUID] [target directory]
sudo umount /dev/[device]
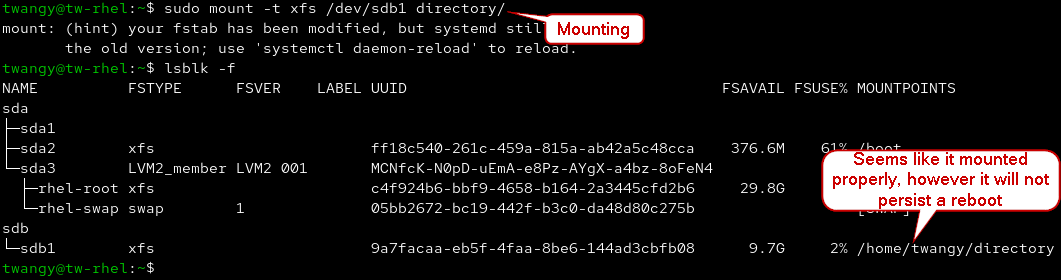
Always mount to empty directories, it will wipe any existing data
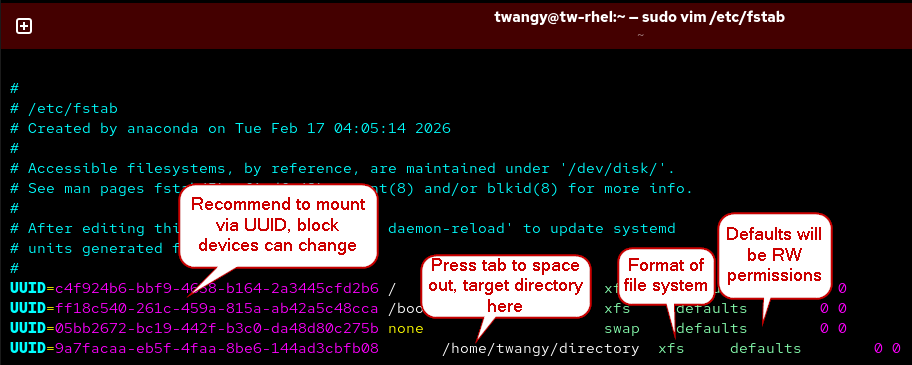
¶ Persistent Mounting
You can have mounts persistent by editing the /etc/fstab file, if you give it default value it will automatically mount during reboot.
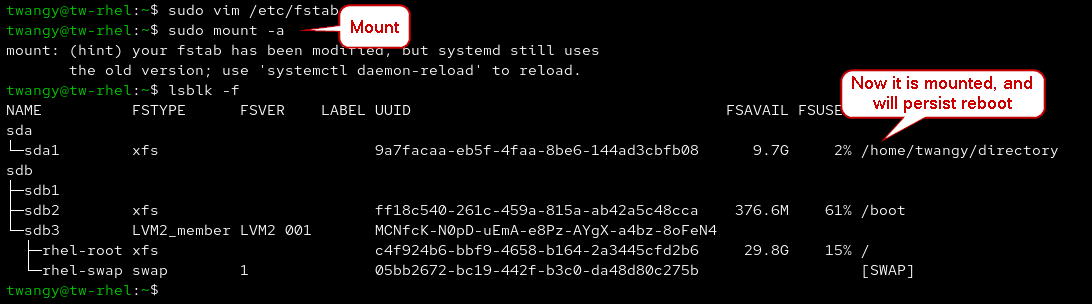
sudo vim /etc/fstab
- You can “refresh” your mounts and confirm it was added. You can also reboot to make sure it persists
sudo mount -a # Mount
lsblk -f # Confirm added
- You can also use systemd to mount and view the status of a mount
systemctl status [mount point] # View status
sudo systemctl stop [mount point] # Stop mount
sudo systemctl start [mount point] # Start mount
ls /run/systemd/generator # View generated mount point files
If you have an incorrect UUID in /etc/fstab and reboot, you will reboot into rescue mode. I did that and learned that you must manually fix the entry so the device can boot up.
¶ LVM
Logical Volume Management lets you pool multiple physical storage devices into one storage pool. It gives you a lot of flexibility when it comes to storage, also LVM is split up into 3 different components.
Physical Volume – Denotes the actual physical drives in play, they are marked with a special marking like a LVM Header
Volume Group – The combination of physical volumes, almost like one big storage blob
Logical Volumes – Taking that big storage blob and breaking it up into smaller pieces, this allows flexibility.
¶ Building Physical Volumes
I am going to add 3 additional disks to my system, that way I can practice building physical volumes.
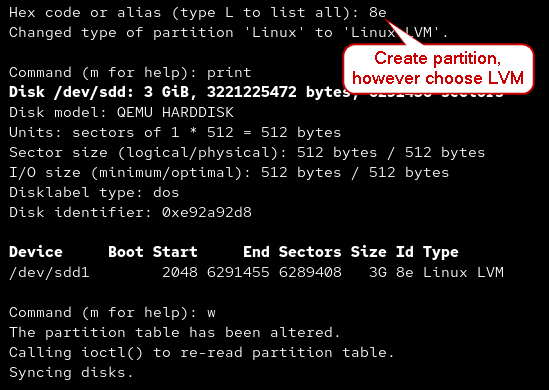
- While creating a partition with fdisk, you can choose to create it as an LVM by using
8e
sudo fdisk /dev/[device]
Screenshot of PV Initialization
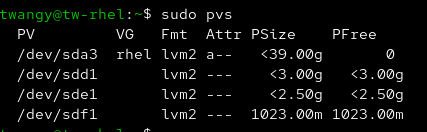
- You can view physical volumes by using pvdisplay. pvs is a more condensed form for this info.
sudo pvdisplay
sudo pvs # more condensed information
- You can create new physical volumes using the pvcreate command.
sudo pvcreate /dev/[dev partition]
¶ Creating Volume Groups
Now that we have created 3 physical volumes, we can create a Volume Group
pvs confirming pv creation
- You can view current Volume Groups on the system by using vgdisplay. vgs will be a more compressed form to view this information similar to pvs.
sudo vgdisplay
sudo vgs
- We can create a new Volume Group by using vgcreate
sudo vgcreate [name of new vg] [target devices]
vgcreate

¶ Subdividing using Logical Volumes
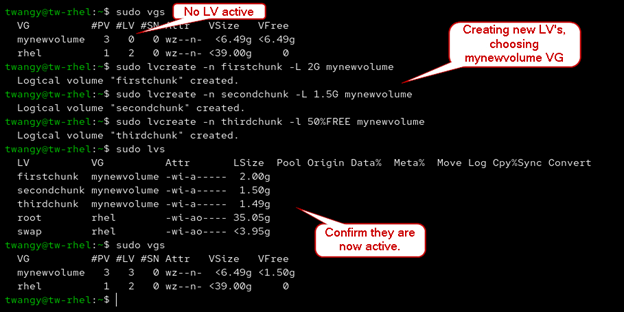
- Similar to viewing Physical Volumes and Volume Groups, you can use lvdisplay or lvs to view Logical Volumes on the system
sudo lvdisplay
sudo lvs
- The nice thing about LVM is that everything is similar, so creating new Logical Volumes is done with lvcreate
sudo lvcreate -n [name of new lv] -L 3G [target volume group]
lvcreate
- So, in my case the LV path would be /dev/mynewvolume/firstchunk. We can use that to create a new file system with mkfs.
sudo mkfs.xfs /dev/mynewvolume/firstchunk # xfs
sudo mkfs.ext4 /dev/mynewvolume/secondchunk # ext4
sudo mkfs.ext3 /dev/mynewvolume/thirdchunk # ext3
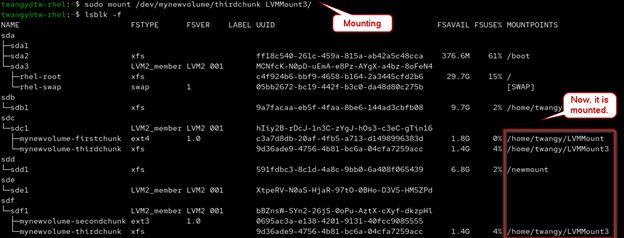
- You can use the LV path to mount these onto the system, or even better use the UUID
sudo mount /dev/mynewvolume/firstchunk LVMMount/
sudo mount /dev/mynewvolume/thirdchunk LVMMount3/
mounting LV
¶ Useful Utilities
¶ Grep and Regex
I will go over the different use cases of Grep, it is a very useful utility to searching through files and information for patterns. I will also go over the basics to Regex, Regex can get pretty complicated pretty quickly...
¶ Grep
The grep command will let you filter out very particular text patterns. The pattern doesn’t have to be an entire match. By default, it will default on a case sensitive basis, similar to how the bash shell operates.
We can filter out information using the command: grep “pattern” [target file]
Some options
-i (Have grep used in a case insensitive manner, so lower case and upper case doesn’t matter)
-r (Have grep run recursively)
-n (Show which line number item was found on)
-c (Will tell you how many matches it finds)
-v (Search inverted, will show everything that it doesn’t match)
- Grep will let you search multiple files, it will show where it found a match.
grep “c” exampletext.txt example2.txt
- Using pipe, we can use grep and narrow down searches in different ways. One example is to ls a directory and look for any files with a specific name
ls /etc | grep -i “net”
- We can have grep run recursively and search multiple directories too
cd /
grep -r “net” /etc
- You can find specific file types using grep, however with the first command below, it might find files that have “txt” included in their name.
ls | grep “txt”
- It might seem like the command below works properly, however if there is hidden files with that extension, it will also find it.
ls | grep “.txt”
A better way to search for file extensions is by using Regex.
¶ Basics to Regex
The caret
^lets us specify that a line must start with a pattern, and the dollar sign$lets us specify that a line must end with a pattern.
- The problem that I brought up earlier can be resolved using regular expressions, using a
$will let us be specific about the end of the search.
ls -a | grep “.txt$”
- Similarly, if we wanted to search for anything that begins with “.txt”, we will use the up arrow instead.
ls -a | grep “^.txt”
- If we use both
^and$, we are matching the entire line exactly. This might not be the result we are wanting.
grep “^ct$” similar.txt # This will only match lines that are exactly ct, nothing more
similar.txt
Cat
Cut
Cot
Bit
Bat
But
Dog
Dot
Dig
Can
Car
- A period
.matches any single character. However, it must be exactly 3 characters long for it to match.
grep “^c.t$” similar.txt
- If we add “Confident” to similar.txt, it will not match using the command above. If we want to match anything between c and t, regardless of length, we can add a asterix.
grep “^c.*t$” similar.txt
- Square brackets will let us use Or logic. For example, it can start with either a B or a C.
grep “^[bc].*t$” similar.txt
¶ Awk and Sed
When talking about manipulating text files, you can edit plain text as well as configuration files. For example, yaml files. You can also store data in json files or csv files.
¶ awk
Awk will let you manipulate structured text files, data that is in columns like a spreadsheet or the /etc/passwd file for example.
Some options
-F (input a different field separator, default is space)
- Let’s create a test file with some columns.
datatest
Dave 25 [email protected] England
Lauren 34 [email protected] Canada
Bob 55 [email protected] USA
Michelle 21 [email protected] France
- Since we have a nice structed data file, we can parse data with the awkcommand. We can print out the first column like so:
awk '{print $1}' datatest
- Similarly, if we want to print out column 2, you would replace the
$1with$2and vice versa with any other columns.
awk '{print $2}' datatest
- With awk, you can print out multiple columns at a time, it isn’t limited to one.
awk '{print $1, $3}' datatest
- You can actually print out your own text alongside of the columns. I will write Hello, my name is in this example. You can also add more information to this too.
awk ‘{print “Hello, my name is “ $1}’ datatest
awk ‘{print “Hello, my name is “ $1 “ and I am from “ $4}’ datatest # Adding more info
By default, the field separator for awk will be a space. If we were to replace that with a comma, like a .csv file. We would have to manually specify the field separator with the -Foption.
Edited datatest
Dave,25,[email protected],England
Lauren,34,[email protected],Canada
Bob,55,[email protected],USA
Michelle,21,[email protected],France
- You can tell awk about the different field seperator like so:
awk -F, ‘{print $1}’ datatest
- If you wanted to easily print out the last line, you can do this by typing $NF. That way you don't have to count columns individually.
awk ‘{print $NF}’ datatest
If we were to peek at the /etc/passwdfile (more info here), all the information is separated by colons. We can parse info out like so and redirect it into a text file
awk -F: ‘{print $1}’ /etc/passwd
awk -F: ‘{print $1, $3}’ /etc/passwd #Print out UID alongside of username
awk -F: ‘{print $1, $3}’ /etc/passwd > users.txt # Redirect into text file
¶ sed
Sed is short for stream editor. We can use sed to manipulate text and data, sed can get pretty advanced.
One thing to note about
sed, is that it will print out the output of the file we are operating on. It will print it out in stdout, so you will see the same line of text on the screen twice. Knowing how to suppress it seems like it will make my life easier.
Some options
-n (Suppress sed from printing out the entire document)
-i (Edits file in place)
- For example, if we were to use sed and print out the first line, you will see it twice. It also prints out the entire document to stdout
sed “1p” sedexample.txt
sedexample.txt
This is just a test to see how sed works
Sed seems super cool and useful
My name is Twangy
I am writing out a fourth line so we have more data
- If we wanted to be more specific, we can use -noption, that will silent out the full text file from being printed.
Sed -n “3p” sedexample.txt
By default, sed will keep the original file left alone, so if you print out some information it doesn’t change anything. -i will let you edit the files with sed. sed “2d” [target file] will show that a line is deleted, however no edit option applied will actually keep the file left alone.
sed “2d” sedexample.txt
- If we wanted it to take effect and edit the file, we would append the option into the command.
cat sedexample.txt
sed -i “2d” sedexample.txt # Delete second line
cat sedexample.txt
- If we wanted to substitute words, similar to vim you can do it like so. Also like vim, you may notice that the first word in the line is changed. Not all the words on the line are changed automatically. Appending
gto the end will let you act globally.
Edited sedexample.txt
This is just a test to see how sed works
My name is Twangy
I am writing out a fourth line so we have more data, I have a lot of data stored on servers.
sed “s/data/information/” sedexample.txt
sed “s/data/information/g” sedexample.txt # Act globally
sed -i “s/data/information/g” sedexample.txt # Edit the file
cat sedexample.txt
¶ Archiving and Compression
There is a couple different compression formats that we can use. It will be similar to how Windows natively uses .zipextensions. For example, there is two different type of archiving formats called .gz and .bz2
What are the differences between .gzand .bz2?
.gz files are created by using the gzip command. You can decompress these files by using the gunzip command.
.gz files use less resources to compress and a bit faster, however they are less compressed then .bz2 files.

.bz2 files are created using the bzip2 command. You can decompress these files by using the bunzip2 command.
bzip2 files are a little more compressed and take a bit less time to create, however they use more cpu power compared to gzip.
If you are doing smalls amounts of tiny data, the differences might be negligable in terms of speed.
- gzip commands.
gzip <target file> #compress file
gunzip <target file> #decompress file
If you cata compressed file, it will not be readable. You can actually open the file in memory, so you can view what is archived without having to decompress it using the command below.
zcat exampletext.txt.gz
- bzip commands
bzip2 <target file> #compress file
bunzip2 <target file> #decompress file
Similarly to gzip files, if you cata compressed file, it will not be readable. However you can open the file in memory similar to how zcatopens .gzfiles.
bzcat exampletext.txt.bz2
¶ More compression tools
There are two other compression tools, first one is xzcompression and the other is zipwhich is something I am a bit more familiar of.
- xz commands.
xz <target file> #compress file
unxz <target file> #decompress file
xzcat exampletext.txt.xz #view compressed file without having to decompress it
There is a big difference between xz, gzip, and bzip2commands compared to zip. One of the cool things with the zipcommand is that you can compress multiple files into one little compression file. You can also compress folder structures.
One thing to note is that you can compress multiple files at once with gzip, however they will compress individually and will not be one folder. Instead of having to gziptwice, you can do one command to archive multiple files individually at the same time. The same behavior happens with bzipand xz.
gzip text1.txt text2.txt
If you were to create a directory and then move the files into it, it may seem like you can compress the folder itself. However if you ls, only the individual files are compressed and not the folder.
mkdir Compressed # Create directory
mv text1.txt example1.txt Compressed/ #Move files into directory
cd Compressed/
ls
You should see the indiviual text files inside of the folder, however if you were to compress using gzip and recursive, it may seem like it works however only the individual files are archived.
cd ..
gzip -r Compressed/
cd Compressed/
ls
With the zip command, we can actually create a single file and put multiple files into it, similar to how it is done on Windows. The .zipwill be what the new file is called, anything afterwards will be what we are compressing. Do keep in mind the files you compressed will be present non-compressed in the original locations.
zip archive.zip text1.txt example1.txt
ls
- zip commands
zip archive.zip text1.txt example1.txt
unzip archive.zip
- We can target a directory directly, I will be preparing a folder so we can archive it.
mkdir ziptest # make directory
mv file2.txt file3.txt example2.txt ziptest/ # move files to new directory
cd ..
Now you can target that folder, you can zip -rand then specify the compressed file's name, I will use twangyzip as the new file name for this example. Afterwards, we can target the directory we want to compress.
zip -r twangyzip ziptest/
You can actually append a new file to an existing .zipfile, that way you don't have to decompress and then recompress.
zip twangyzip.zip example1.txt
¶ Archiving
For the purpose of the RHCSA exam, we have to know how to create archives as well as list the contents of that archive. We also need to know how to compress and extract said archive. When we are talking about archiving, it means we are grouping files or directories together.
One thing to keep in mind is that archives are not always going to be compressed, compression doesn't happen automatically. Just by having an archive, that doesn't necessarily mean it is always neatly compressed. Though it can be created with compression manually applied to it.
Tar archives.
Also can be called "Tarball" if a Tararchice is compressed.
- Tar will allow us to preserve the
files, however you can also preserve thepermissionsand the way the files arestructured. For example, archiving a particular directory will preserve the exact layer of said directory.
Some Tarswitches.
-c (Create a new archive, this acts recursively)
--delete (Delete particular files from archive)
-r (Expand archive, appends files to archive)
-t (List the contents of an archive)
-x (Extract files from an archive)
-f (Specify the file we want to archive)
-z (Compress archive with gzip)
-j (Compress archive with bzip2)
-C (While extracting, you can have the extraction point to a differnet folder/directory
Hint: Any easy way to remember tar is
tar -cf <output> <input>
You can decompress tar archives usingtar -xf <input>
We can create an archie. You may notice the archive is not compressed currently
tar -cf myarchive.tar file1.txt file2.txt
ls -lh
# Additionally, you can archive a folder similarly
tar -cf myarchivefolder.tar /path/to/folder
List contents within a tar archive
tar -tf myarchive.tar
# You can also view more info
tar -tvf myarchive.tar
Extract tar archive
rm file1.txt
rm file2.txt
tar -xvf myarchive.tar
ls
Create compressed tar archive with gzip
tar -czf compressedbackup.tar.gz file1.txt file2.txt
ls -lh
View and extract compressed archive
tar -tvf compressedbackup.tar.gz #View files in archive
rm file1.txt file2.txt
tar -xzf compressedbackup.tar.gz #Decompress
tar -xzf compressedbackup.tar.gz -C /tmp #Decompress into a different directory with the -C flag
¶ CPIO
CPIO command will allow us to create archives via redirection. (“<” and “>”). From what I am hearing, I honestly might prefer Tar archives more, however this utility is useful if you need to archive specific things like file types.
CPIO (Copy in and out) is a little bit more complex because of the syntax, however there is valid use cases to it.
- You can find specific files using the find command.
man find
- If we wanted to pull up an example, the findcan show everything in the home folder.
find
- If we wanted to be a little more specific, for example if we wanted to find anything ending in .py, we can use the find command to do this
find / -type f -name “*.py”
- Also using the “|” (pipe) to make the output of the above command, turn into the input into another command.
Find / -type f -name “*.py” | cpio -ov > pythonbackup.cpio
Some CPIOswitches.
-o  Create archives
-i  Extract files from an archive
-t  List files
- We can also make a couple test files, afterwards we can create a cpio archive using the output of the “find” command
vim example1.conf
vim example2.conf
find . -name “*.conf”
- Then using the output to be the input into cpio
find . -name “*.conf” | cpio -ov > confarchive.cpio
ls
- One thing we can do is move the archive and then extract it to a different directory
mkdir configurations
mv confarchive.cpio Configurations/
cd Configurations/
cpio -iv > confarchive.cpio
ls
Just like with tar, cpiowill not be compressed automatically. You can choose to compress cpio archives though.
Doing a similar command to find the .conf files, we can add another “|” to let another output be another input for the bzip2 command.
find . -name “*.conf” | cpio -ov | bzip2 > compressedconfarchive.cpio.bz2
ls -l